Configure Planning Time and Actuals
Set the model range and granularity, place the last actual date, verify source periods, and roll the forecast forward safely.
Summary
This guide aligns a planning model's calendar, actuals, and forecast periods.
Capabilities
You can align the planning model’s calendar and time periods, configure granularity, place the last actuals boundary, refresh source actuals, recalculate forecasts after changes, and roll forward to reflect recently closed periods. Display settings help tailor calendar views for distinct audiences without impacting source data. Ensures smooth transition between actual and forecast periods while supporting audit trails and collaboration.
Prerequisites
Before You Start
- Identify the decision horizon.
- Confirm the latest closed source period.
- Refresh the required planning sources.
- Save a named version before changing an established timeline.
- Tell active collaborators when the change affects shared views or reviews.
Concepts
The planning model applies a timeline consisting of historical actuals followed by forecast periods, divided into selectable time units such as daily, weekly, monthly, quarterly, or yearly. The last actual date defines where source data ends and forecasts begin. Versioning preserves snapshots for auditing and comparison through changes or roll-forwards. Display conventions (relative dates, fiscal years) help fit differing review needs.
Workflow
1. Choose Granularity
Open Model settings and select:
- Daily
- Weekly
- Monthly
- Quarterly
- Yearly
Choose the smallest period the decision requires.
| Decision | Typical granularity |
|---|---|
| Short-term liquidity | Weekly |
| Operating forecast | Monthly |
| Board or long-range plan | Monthly or quarterly |
| Multi-year strategic case | Quarterly or yearly |
2. Set the Date Range
Enter the start and end periods.
Check that the range includes:
- enough actual history to establish the starting point
- every forecast period needed for the decision
- seasonal periods when seasonality matters
- any covenant, board, or cash milestone under review
Changing granularity aligns dates to the selected period boundaries. Review the resulting start and end after the change.
3. Configure the Display
Choose the display settings needed by the audience.
- Turn on Use relative dates for Month 1, Quarter 1, or Year 1 sequences.
- Turn on Start relative dates at 0 when the model convention starts at Period 0.
- Turn on Use fiscal years and select the fiscal start month when needed.
- Turn on Highlight today to mark the current period visually.
Display settings do not refresh source data or move the actuals boundary.
4. Verify Actuals
- Open the source controls.
- Refresh each required source.
- Wait for success or review the error.
- Compare one known source period with the model.
- Check units, signs, currency, and dimension mapping.
Do not move the last actual date beyond an unverified period.
5. Set the Last Actual Date
Turn on Last actual date and select the latest reviewed period.
The selected period becomes the cut-off for imported data. The next period becomes the first forecast period.
Check:
- actuals end at the boundary
- forecast formulas begin after the boundary
- no assumption unintentionally overwrites an imported period
- the first forecast period has every required opening balance
6. Recalculate and Review
If calculation is automatic, wait for the status to return to Up to date.
If manual mode is active:
- Select Run calculation.
- Wait for completion.
- Review any failed or stale status.
- Check the first forecast period.
7. Roll Forward After Close
When a new period closes:
- Save a version of the pre-close forecast.
- Refresh actuals.
- Verify the newly closed period.
- Open the roll-forward control.
- Review included sources and linked models.
- Move the last actual date.
- Recalculate.
- Compare the new forecast with the saved pre-close version.
Use a version label such as Pre-close forecast, June.
8. Update Views and Exports
Review saved views, charts, and export definitions after a timeline change.
Confirm:
- expected periods remain visible
- fiscal labels still make sense
- relative-date views still describe the right sequence
- comparison versions remain comparable
- exported columns match the new horizon
Behavior specification
Troubleshoot
The new actual period does not appear
Refresh the source, confirm the dataset includes the period, and check the model's source link and date range.
The first forecast period is blank
Check opening balances, formulas, last actual date, and whether inputs begin in the correct period.
The model cannot shorten the range
Clear or move the last actual date first. Then check formulas or artifacts that reference removed periods.
A comparison version is marked Not comparable
The saved version can use a different granularity or currency. Preview it for context rather than treating the values as a direct comparison.
The roll-forward changed a linked model unexpectedly
Restore the pre-roll version if necessary, then repeat with the correct linked-model and source scope.
Diagrams
Rendering diagram…
Screenshots
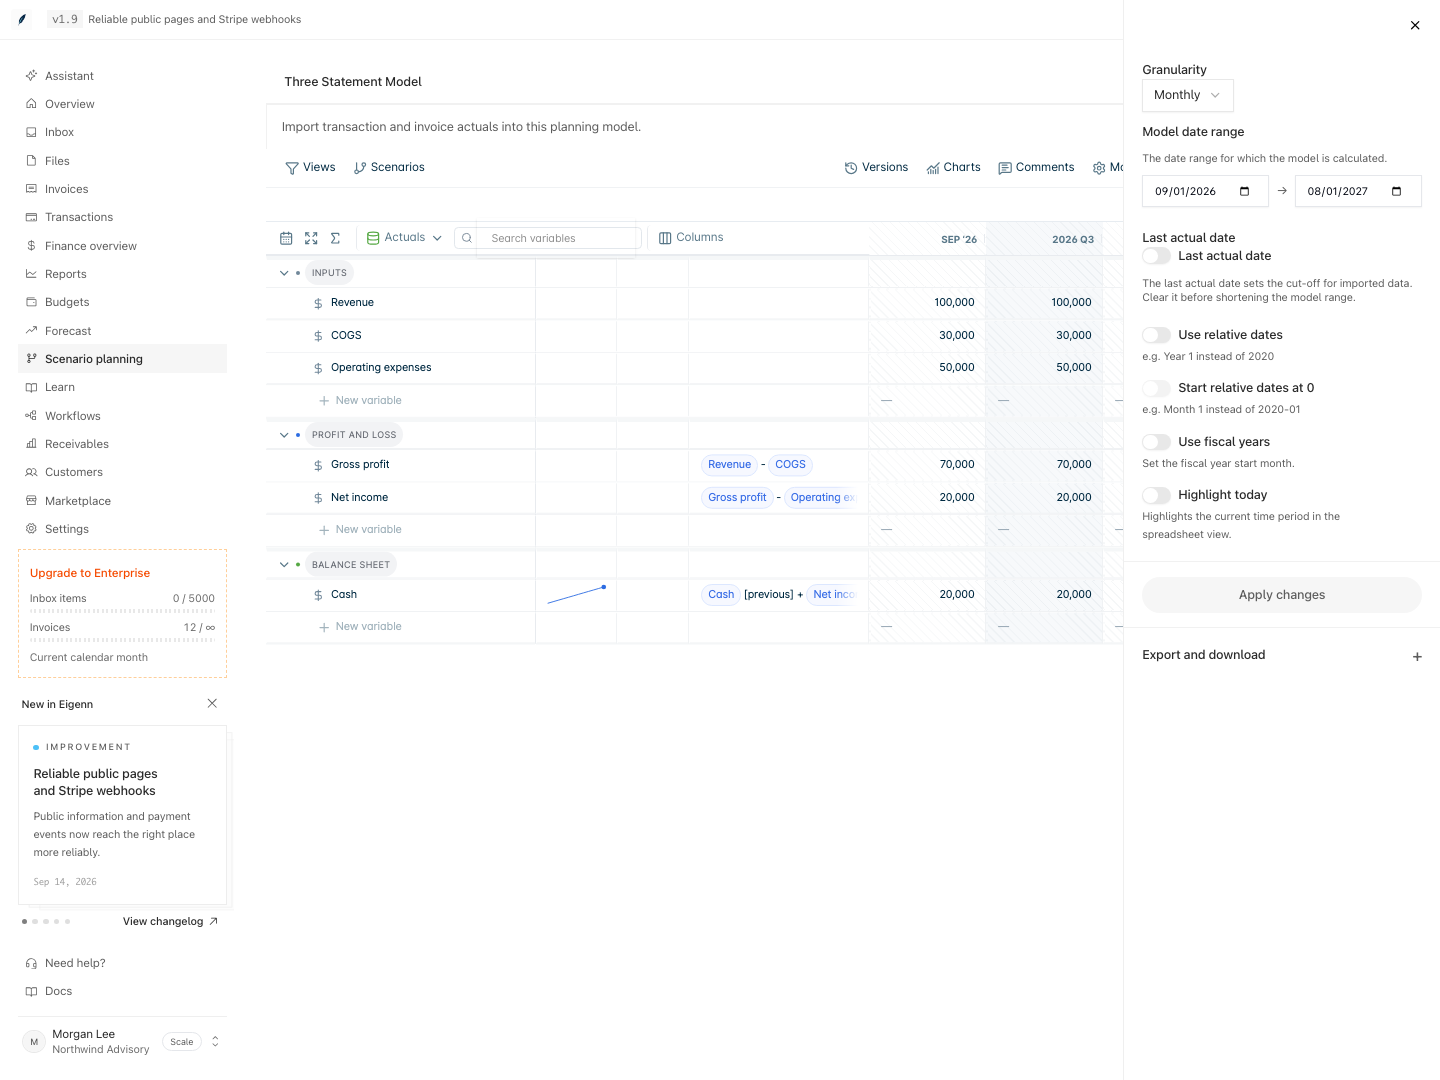
Model time settings for monthly periods, the actuals cutoff, relative dates, and fiscal years.
Shown with synthetic data in a local workspace.
Verification
- Open model settings and confirm the chosen granularity appears (e.g., 'Weekly') and matches the decision context.
- Set date start and end; check the periods visible in the main view align with the specified history and forecast range.
- In display options, enable relative or fiscal dates as needed and verify the visual labels reflect your choice.
- Refresh all source actuals; the data in the latest period should match an external reference source for that period.
- Set the last actual date and verify that actuals end exactly at that boundary and forecasts begin immediately after.
- Trigger recalculation if needed; on completion, verify no errors and that the first forecast period contains expected data.
- After a roll-forward, check the last actual date, visible periods, and that saved views/exports now reflect the new timeline.
- For any issue (e.g., missing period, blank forecast, comparison warning), follow the troubleshooting steps and confirm resolution.