Compare and Share Planning Scenarios
Build a focused alternative case, compare it with the base, save a review view, and share the right level of access.
Summary
This guide creates one reviewable scenario in a planning model and shares a focused view without exposing unnecessary model detail.
Capabilities
The feature allows users to create alternative planning scenarios, compare them against the base model, save custom review views, and share those views with others at specified access levels. It also supports managing scenario merges and promotions with recovery safeguards.
Prerequisites
Before You Start
- Use a model with reviewed actuals and a clear base case.
- Identify the decision and the small set of assumptions that change it.
- Know who owns the model.
- Use a team owner account to create models and manage sharing. Creating or changing grants requires Scale or Enterprise. Recipients must be active teammates.
- Decide whether the reviewer needs view or scoped edit access. Team viewers cannot receive edit access.
Concepts
Scenario planning lets you define alternatives to the current financial or operational case by adjusting key variables. Scenarios should be focused on a clear question with minimal unrelated edits. Access levels determine how collaborators can interact with the shared view, and scenario merging/promotion affects how changes are incorporated into the main model.
Workflow
1. Open the Correct Model
- Select Scenario planning to open the model library.
- Open the model.
- Confirm the model name and date range.
- Confirm that the base case is active.
- Check the latest source refresh and actuals boundary.
Do not build a scenario on stale actuals unless the review explicitly needs a historical snapshot.
2. Define the Question
Write the scenario question in one sentence, such as:
- What happens if collections move 30 days later?
- What happens if hiring starts one quarter later?
- What happens if the top customer leaves?
- What happens if costs rise 8%?
A scenario should describe an alternative case. It should not contain unrelated cleanup edits.
3. Create or Select the Scenario
Open Scenarios in the model toolbar. Select Create scenario, enter a Scenario name, and select Save scenario. A blank name does not create a scenario.
To return to an existing case, open Scenarios and select its name.
Give it a specific label. Include the business change, not only Downside or Option 2.
Examples:
- Collections +30 days
- Hiring delayed to Q2
- Top customer loss
- 8% cost inflation
4. Apply the Overrides
Change only the variables that define the case.
For each override:
- Confirm the variable.
- Confirm the start period.
- Enter the scenario value.
- Check the units and sign.
- Add a comment when the rationale needs review.
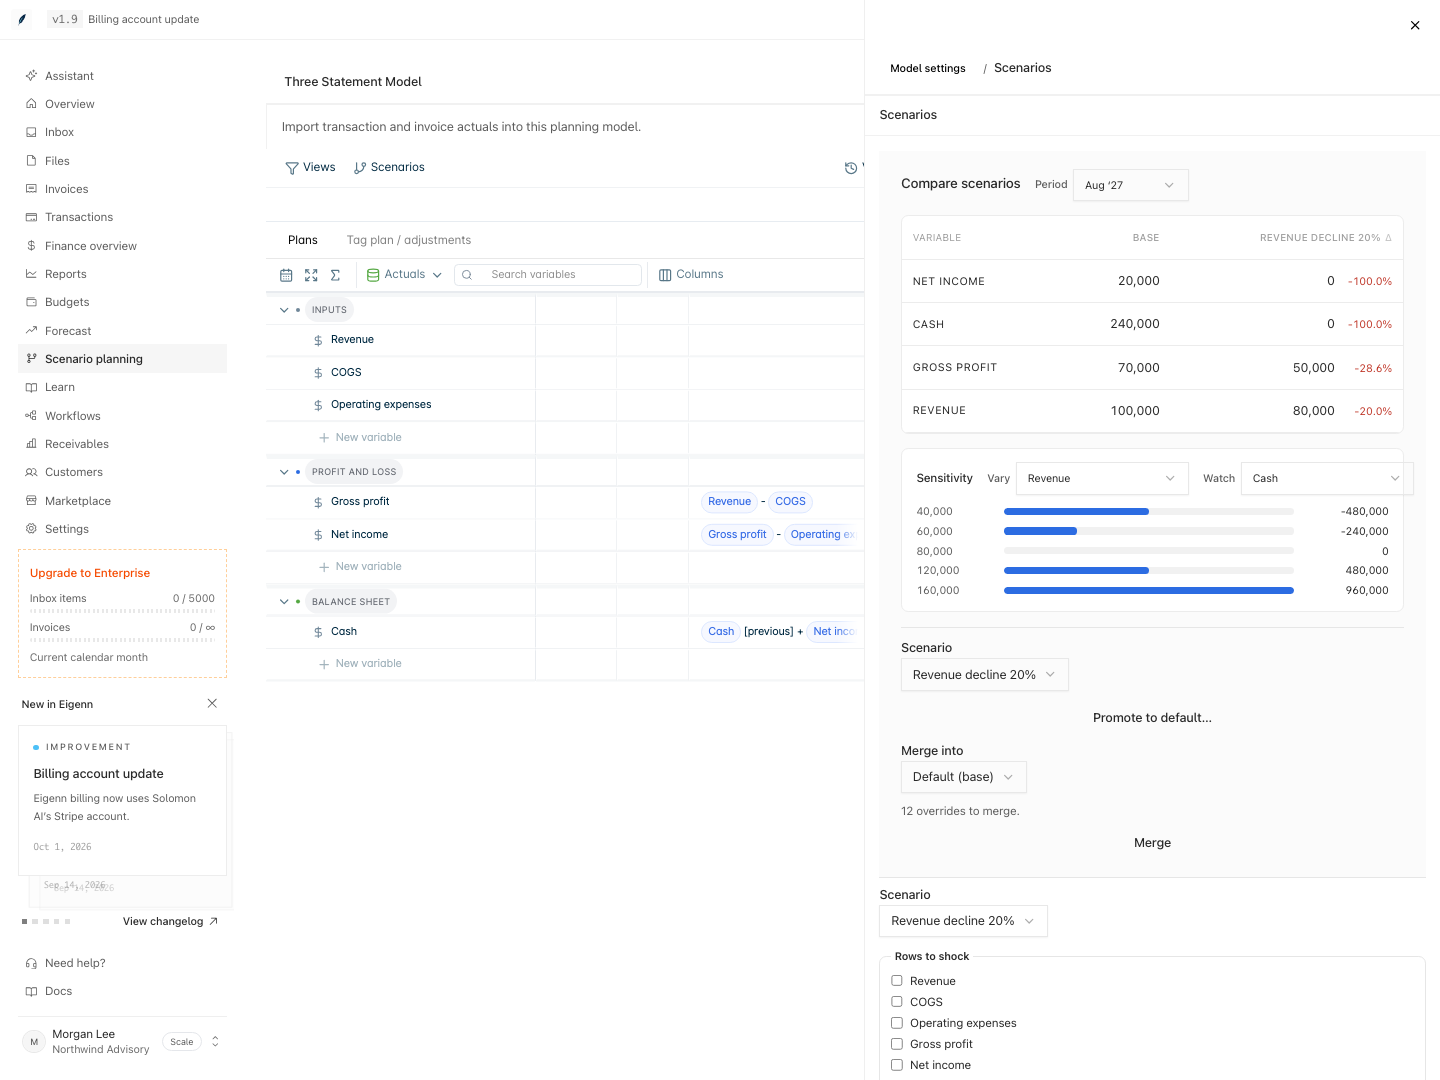
For a supported shock, open Model settings → Scenarios. Under Rows to shock, select the affected variables. Choose Percent (%), Add amount, or Set value, enter the value, and choose the period window. Select Apply shock and read the applied/skipped result. Actuals and closed months are not changed.
For example, select Revenue and Revenue drop −20% to reduce forecast revenue in the alternative case. The base remains unchanged.
5. Compare With the Base
Open Model settings → Scenarios and find Compare scenarios. Use Period to select one period at a time. Change that selection to inspect how the difference develops over time. On a narrow screen, scroll the comparison table horizontally to see additional columns.
Review:
- changed assumptions
- values and differences for the selected period
- key output deltas
- cash, runway, margin, headcount, or receivables impact
- the first period where the cases materially diverge
A scenario delta explains modeled change. It does not prove that the alternative will occur.
6. Run Uncertainty When Needed
When the model contains ranges or probability formulas:
- Open Formula uncertainty.
- Select Run simulation.
- Choose the key output variable.
- Choose the decision period.
- Record P10, P50, and P90.
Use percentile output to describe the modeled range. Keep the deterministic base and scenario comparison visible as well.
7. Save a Review View
Arrange the model so the reviewer sees:
- the key assumptions
- the base and scenario outputs
- the necessary periods
- the active scenario label
- any comments that need a decision
Open Views → New. Enter a View name and use Add filter to choose variables, scenarios, periods, or charts. For a revenue-only review, add a Variable filter and select Revenue. Select Save and apply to save the view and inspect its filtered result.
Use a label such as Board review, Collections +30 days. A blank view name cannot be saved.
A saved view keeps presentation. It does not freeze source values or formulas.
8. Choose Access
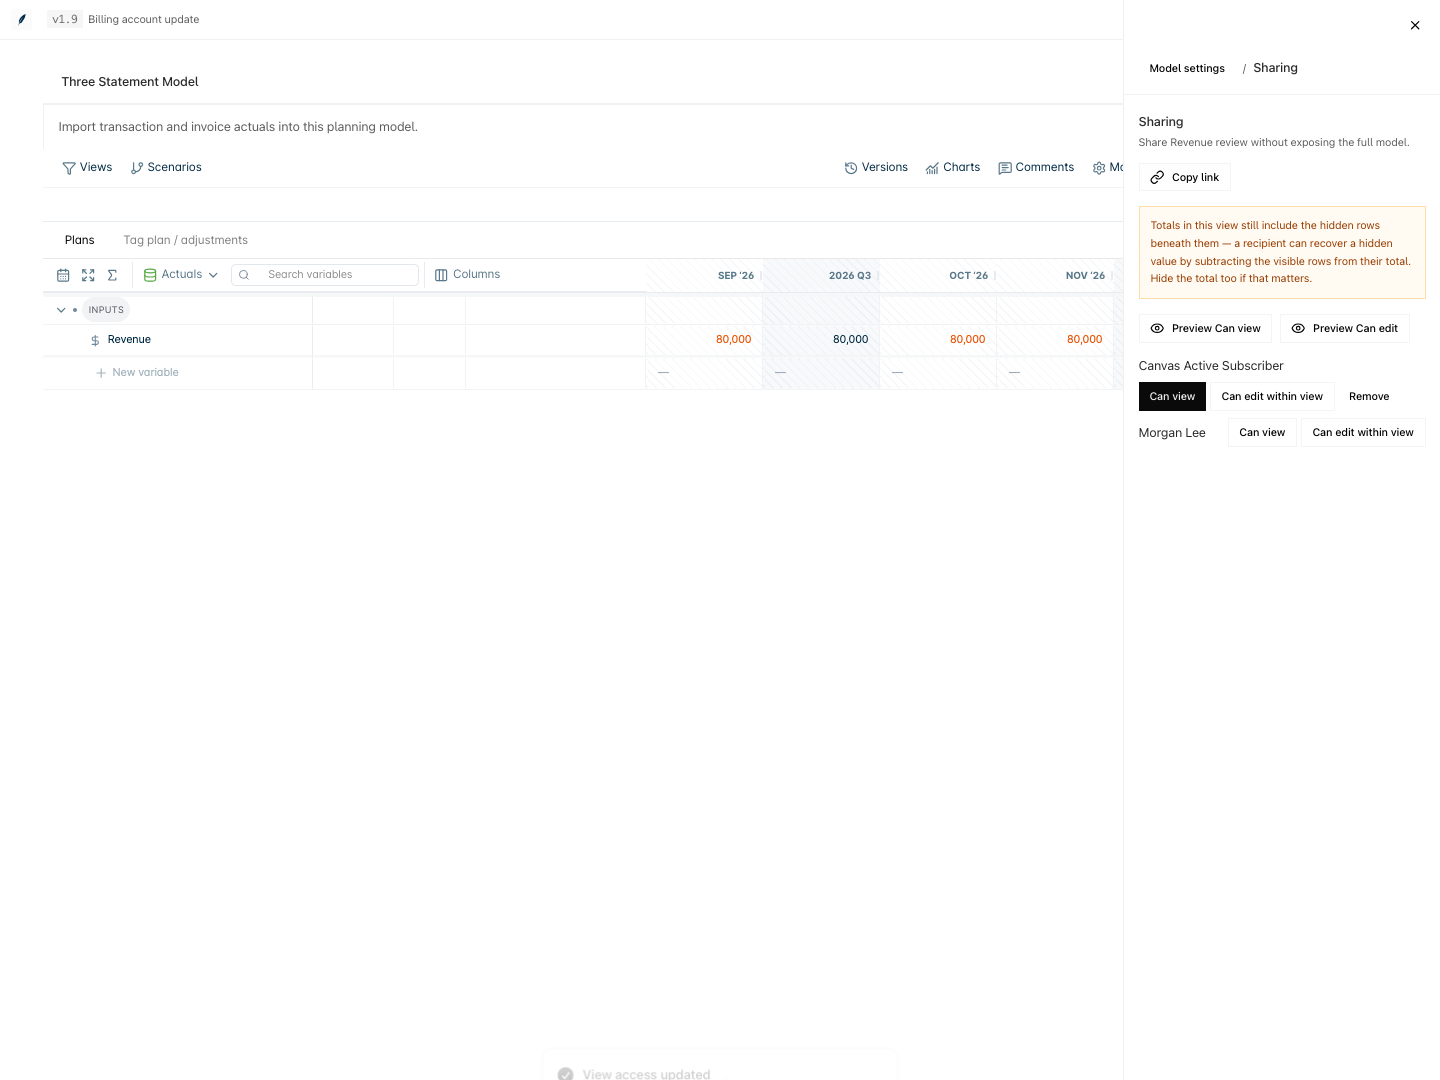
A team owner can select the share icon beside a saved view in Views, or open Model settings → Sharing, choose the saved view when prompted, and review the recipient preview. Set access beside the intended teammate:
| Access | Use it when |
|---|---|
| Can view | The recipient only needs the result. |
| Can edit within view | The recipient is responsible for input or formula changes inside the shared view. |
Use the lowest access that supports the review. Select Preview Can view or Preview Can edit to check the server-filtered result before granting access.
9. Share and Verify
- Open the sharing controls for the saved view.
- Choose the teammate.
- Assign the access level.
- Select Copy link.
- Open the link in a separate browser context when possible.
- Confirm the correct model, view, scenario, periods, and access.
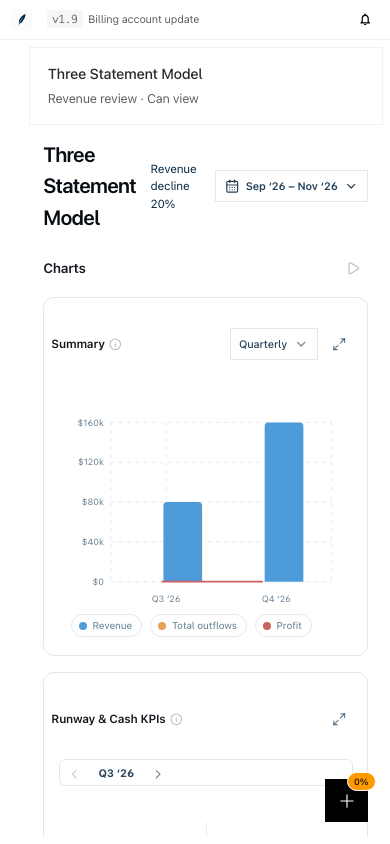
Sharing one saved view does not automatically expose every saved view in the model. A Can view recipient opens a dashboard without spreadsheet editing.
Saved-view access survives model saves and reloads. Changing the saved filters changes the scope recipients can see. Deleting the view removes its grants; recreating a view does not restore old access.
To revoke a grant, select Remove beside that teammate. On their next load, the link shows This shared view is unavailable.
Check hidden totals before sharing. A visible total can still include hidden child rows, and a scenario filter alone does not hide variables that fall back to the base. Hide sensitive totals and use explicit variable filters when the view must exclude a row.
10. Record the Decision
After the review:
- resolve or answer comments
- update the scenario assumptions when the decision changed
- save a version before a structural revision
- keep the scenario as an alternative, or promote it only when the team intends to replace the base
Promotion and merge are owner-controlled and high impact. Eigenn creates a recovery version before those operations.
Behavior specification
Merge or Promote Carefully
Use Merge when selected overrides should be copied into another scenario or the base. The source scenario remains available.
Use Promote when eligible input overrides should become the new base. Promotion skips calculated-row overrides, removes the promoted scenario, and can change sibling scenarios or shared views where they inherit base values.
Before either action:
- Confirm the target.
- Review every override.
- Check the model owner.
- Tell active collaborators.
- Confirm the recovery version appears after the operation.
Do not use promotion only to make the preferred scenario appear first.
Diagrams
Rendering diagram…
Screenshots
Verification
Troubleshoot
The shared view opens the wrong scenario
Open the model, select the intended scenario and saved view, then copy the link again. Confirm the URL contains the intended model and view context.
The reviewer cannot edit
Check that the share is Can edit within view and the teammate is eligible to edit. Can view is read-only.
A merge or promotion fails
Refresh the model and confirm owner access. The operation can be rejected when the model changed after your current revision loaded.
The scenario output did not change
Check that the overridden variables feed the output formula and that the change begins inside the visible period.
- Open the correct model and scenario: The correct model, date range, and scenario label appear as expected in the interface.
- Apply scenario overrides: Only intended variables have new values, and changes are visible in comparison outputs.
- Save and share a review view: The recipient, upon opening the link, sees only the saved view, the correct scenario, outputs, periods, and any relevant comments.
- Access level check: Recipients have the actions (view or scoped edit) appropriate to the access level chosen during sharing.
- Merge/Promote actions: After merge or promote, changes appear as expected in the target scenario or base, and a recovery version is listed in model history.
- Troubleshoot: If the view, scenario, or access is incorrect, following troubleshooting guidance restores the intended result.